Tuesday, April 21, 2020

Roadbed and Track

Still catching up a bit, I did not wait long before I started laying down the Homosote roadbed on the new plywood.

I had come into possession of a box of Homabed from California Roadbed.  The product is a milled Homosote in the general profile of a railroad roadbed.   The company had been out of business for some time but I had the supply so I used it.  Another company, Cascade Rail Supply, had begun making a similar product.  Because I want to elevate my main line over sidings and other tracks, I needed a lower profile roadbed so ordered a supply from Cascade Rail Supply.  The product was similar but probably a little superior to the old California Roadbed product.  Unfortunately, Cascade Rail Supply closed in 2019 so modelers are left with no source that I know of for Homasote roadbed.
Homasote is still manufactured although not always easy to obtain out west.  The manufacturer maintains a web page and has a product locator http://www.homasote.com/wheretobuy

I roughed in where the tracks were to go and laid down the Homasote road bed using white glue and clamps.
 Wood glue was used to attach the roadbed. C-clamps and small pieces of wood were used to hold the roadbed in place until dry

 Here the roadbed has already been laid and some flex track loosely set on the road bed to check placement.  Some of the underlying route markings can be seen in the right foreground for future roadbed locations.


Once the roadbed was down I laid the track.  For the main line I used Shinohara HO Scale Code 83 Flex Track.  The flex track has hole in the ties every so many ties so we used those and small spikes from Micro Engineering to secure the flex track main to the Homasote roadbed.   I got some help from the local model railroad club I belong to.
                John R laying track on the lower level near Summerland  while Bob L lays track beteen Surf and Tangair

Sometimes working on both levels at the same time got a bit crowded

For the sidings I reused the Central Valley Branch Line Tie Strips which I had salvaged during the removal of the Masonite Splines.  These tie strips have the ties spaced further appart than either the CV Mainline Tie Strips or the Shinohara HO Scale Code 83 Flex Track.  I also utilized code 70 rail to further differentiate between the main and the siding.

 Because I had had some issues with the contact cement holding the rail onto the ties, I actually spiked the rail down.  This entailed drilling holes in the ties and manually spiking the rail in place.  I used track gauges and spiked every 6th tie or so.

This is a later photo but shows the array of tools that I use to lay the rail on the Central Valley Tie Strips.  The tools include Ribbon Rail gauges, Railway Engineering Rollee Holders, MicroEngineering small spikes, a pin vice with a small drill bit, an NMRA track gauge, rail joiners, a MicroMark pair of spiking pliers and sometimes a mirror for sighting down the tracks.

Tools in use while adding rail to Central Valley tie strips

Another view down the track with some other tools


Saturday, April 18, 2020

Removing Spline and Replacing with Plywood

So after having some issues with the Masonite splines, I regretfully decided to remove most of them and replace them with plywood.

The principal reason for removal and replacement was that even though I tried my best to keep them level both along the track and also across the track, I was not successful.  I tried using a belt sander.  That did not work.  I tried putting in shims to level the track across.  That worked to a degree but was very time consuming.

The other disadvantage of the Masonite spline was that I could not spike into the Masonite.  Originally, I had assembled the splines with a beveled edge on the outside of the roadbed to simulate the shoulder of the ballast.
                                                  Photo of a piece of removed spline showing the beveled edges.                                                  The slot visible in the upper portion was for the track feeders

I had glued the Central Valley Tie Strips directly on the Masonite splines.  When the original Barge cement dried the rail often came off the tie strips and needed to be reattached.  If I had put a Homasote roadbed on the spline I could have spiked the rail down that would have helped but that was not to be. 

It was a difficult decision to remove 175 feet of spline as it had taken quite a lot of time to install it and lay the track.  It also is the major part of the railroad.  Only the yards were on a plywood Homasote sandwich so all the main and siding tracks outside of the yards was removed with the exception of the Surf Wye.

Gary Siegel, of the L&N Eastern Kentucky Division, volunteered to help.  The entire railroad was done in about three days over the period from July 28 to August 4, 2017.  The first step was to remove the Red Rosin paper a la Howard Zane that I had used adjacent to the roadbed.  The track feeders from the  power bus were removed.  The switch motors were removed from the turnouts for sidings and spurs. Then the track and ties were removed.

East end of Goleta Siding area showing Red Rosin paper

Middle of Goleta Siding area

West end of Goleta Siding
West end of Goleta Siding with Red Rosin paper, track and ties removed


We set up saw horses just outside the garage and cut the plywood using a jig saw. The spline was cut in sections and used as a template to cut the plywood.  In most cases the plywood was cut just a little wider than the spline it was replacing.  Where there were spurs or sidings, the plywood was cut wide enough to handle both tracks. 

Because I had model the sidings lower than the main I used two methods to achieve this.  Most of the time I used two different thicknesses of Homasote roadbed (more in a later post).  In some areas the replacement plywood was cut to allow for the lower grade on the spurs and sidings.

For the most part, the horizontal supports for the spline could be reused but the vertical supports were adjusted to level out the plywood.  As the plywood was installed, a level was used to check both across the track and along the track to eliminate the problems we had with the spline.

With just the two of us, we were busy so I did not take a lot of photos.  Here are a few from the Goleta - La Patera area.
 
Goleta Station looking east showing plywood replacement in progress
 
Goleta Station area looking west showing plywood replacement in progress

Goleta Station area looking east with plywood replacement complete

Goleta Station area looking west showing plywood replacement complete

Here are two more photos of the pile of removed splines.

Pile of removed splines

Close up of removed splines with a yard stick for scale

Monday, April 6, 2020

Return, Rebuild and Beyond

Has it really been over two years and eight months since I posted here?  So much has happened.

The railroad is still alive,  In fact it is getting closer to operation than ever.  After the disasters of the operation session during SoCal Ops in June of 2016 - see the Plan, Build Diversion post - I did manage to plan for the replacement of the Masonite splines.

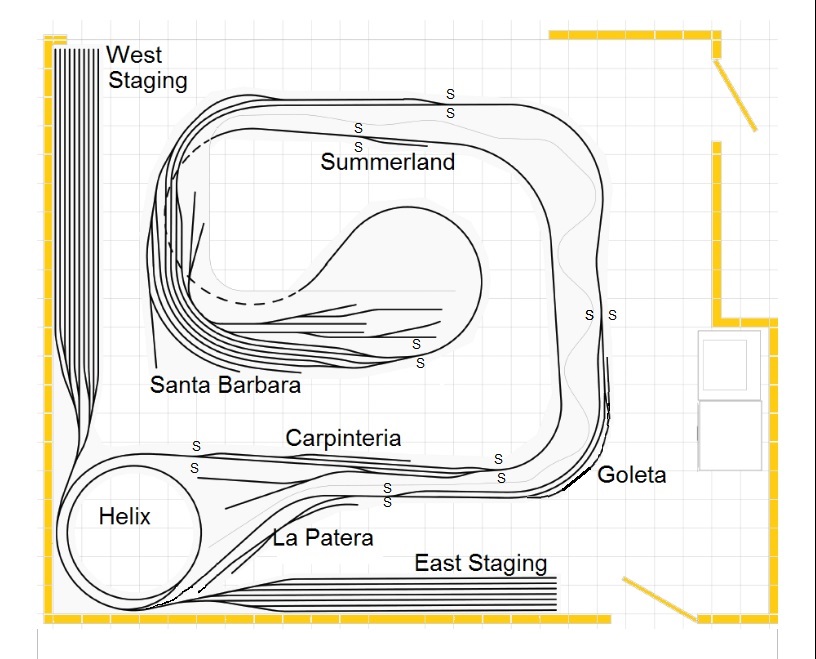
Over a year later I finally tore out about 175 feet of spline and replaced it with plywood.  That was followed slowly by laying Homasote roadbed on the plywood, and later relaying track on top.   I took the opportunity to add additional tracks at Goleta and La Patera.  I also added detection for a future signal system.  All this will be posted here in more detail as I catch up in the coming weeks in reporting the progress of the Santa Barbara Subdivision.

I continued my usual diversions including operations events, national NMRA conventions in Kansas City and Salt Lake City, trips to Spain, Portugal and Morocco,

 a trip to Canada to find some of my roots,


participation of an excursion of the restored Big Boy 4014,

along with all my responsibilities locally, both railroad related and otherwise.  I will share some of these experiences as well as we move forward.

I have enjoyed railroads and model railroading for the past 67 years and hope to continue to do so for the foreseeable future.  Stay with me on the journey.